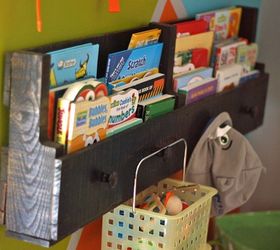
My son's book collection was quickly multiplying and causing a huge mess in his room (and Momma here was getting very tired of cleaning books up off the floor multiple times a day). We were in desperate need of a storage solution, and when my husband snagged some free pallets from work, I knew just what to make!
I scoured the interwebs for ideas and found a nice tutorial for a pallet newb such as myself, and I decided to add a little bit of *extra* storage by including little knobs on the front of each shelf. Now the shelves do more than just house books!Here's how we disassembled a pallet to make two bookshelves. It's basically just two line cuts (we used a reciprocating saw....definitely recommend one of these!) to remove the ends of the pallet, which will become the shelves. Then you just pop off two boards from the center of the original pallet, and attach those two boards to the bottom of the pieces that were just cut off and wham-o! There are your two shelves. All it took were screws and drywall anchors and these shelves were now attached to the wall in my son's room.
(I know you're probably thinking "That's a crazy paint job!"....and it is! But it's the perfect bright and playful vibe for my son's room. You can check out my post for how I made the bright and bold accent wall on my blog at http://www.wherethesmileshavebeen.com/bright-and-bold-accent-wall/) Now these shelves have allowed for TONS of storage space for my son's books, and the knobs allow for even more organization of things like his hats, backpack, baskets filled with tiny toys, and so on. I just love them....and you can't beat nearly FREE!
 My son can freely walk over to the lower shelf and grab (or as I always hope for but rarely see, put away) books at his leisure. For books that are a little too advanced or delicate, we keep up on the top shelf and out of his reach for now.
 Hanging a basket off one of the lower knobs is also a nice home for lots of his tiny toys that tend to fall to the bottom of his larger toy bin.
 These shelves can easily be removed and rehung throughout the years, and can certainly house more than books.
 For the FULL tutorial including the original site I followed, lots of extra details, and a supply list, check out the blog post!: http://www.wherethesmileshavebeen.com/how-to-make-and-install-pallet-bookshelves/

Original article and pictures take http://www.hometalk.com/10844545/how-to-make-install-pallet-bookshelves-with-knobs-on-the-front site


Комментариев нет:
Отправить комментарий