среда, 24 мая 2017 г.

plant stakes

handmade


plant takes, gardening


plant takes, gardening


Original article and pictures take http://www.hometalk.com/1092350/plant-takes site

These Items Can't Possibly Have Any Connection, BUT They Do.

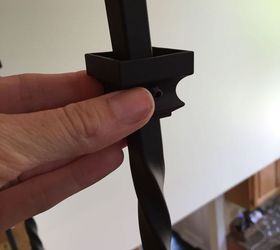
Counter edge band damaged. 15 year old match impossible to find.


Having finally identified the laminate manufacturer, I called the local distributor who sent me directly to the manufacturer. The manufacturer had received a sample piece from me, came up with a CLOSE match. Several months of communication sent me back to the local distributor who could do nothing for me. I finally found someone 5 hours away who could get a full sheet of the close match, that I would have to come pick up. All for a mere $56.00, not to mention time, gas, and someone to cut and install it.I considered mosaic tile, but couldn't find anything that looked appropriate, and that would have meant doing the entire edging through out the kitchen. MONEY, money, money. Something I have preciously little of to spare.


these items can t possibly have any connection but they do, countertops, home maintenance repairs, kitchen design, repurposing upcycling


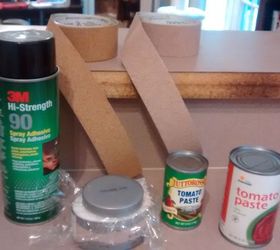
This is what I had to work with. I considered Washi Tape, but after looking at it in the stores, it would not have worked as it was not substantial enough.


these items can t possibly have any connection but they do, countertops, home maintenance repairs, kitchen design, repurposing upcycling


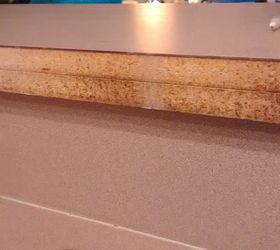
Walmart to the rescue... $4.97 for their Cork Duck Tape. Now if I can find a tiny (cheap) bit of paint to tint. Off to Lowe's. Much to my surprise, they offer sample jars of tintable paint for $3.98. We came close to the basic overall color.


these items can t possibly have any connection but they do, countertops, home maintenance repairs, kitchen design, repurposing upcycling


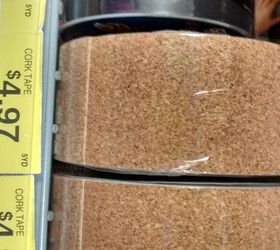
The Duck Tape was not only wide enough, but thick enough. Tried whitewashing method. Not so good.


these items can t possibly have any connection but they do, countertops, home maintenance repairs, kitchen design, repurposing upcycling


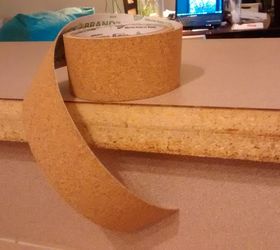
After applying 4 very thin coats of paint, wiping them off as much as I could, this was a pretty close match. The texture of the Cork also matched up with the matrix dots of the laminate.


these items can t possibly have any connection but they do, countertops, home maintenance repairs, kitchen design, repurposing upcycling


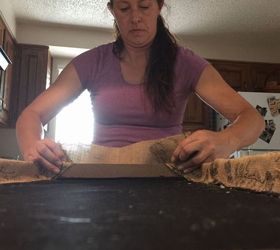
The protective paper was taped to the top edge of the counter, and below, and anywhere else I thought I might clumsily spray with the adhesive. This is after the spraying on both the counter edge and the sticky side of the duck tape. It took about 2-3 minutes for it to get properly tacky. The hardest part was getting over into the furthest corner to start sticking it very carefully without attaching the strip to itself. And how does the tomato paste come into this equation, you ask? I used it to roll any bubbles out and pressure seal it. Worked great!


these items can t possibly have any connection but they do, countertops, home maintenance repairs, kitchen design, repurposing upcycling


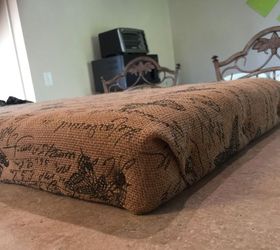
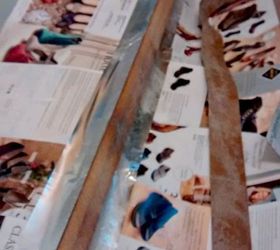
The only thing left to do is Mod Poge it to seal it. My contractor neighbor is amazed at my ingenuity. He is sure a home inspector will never even notice it, should I put the house up for sale. So, readers, If I, a 71 YO woman, can do this, anyone can! Just a bit of thinking outside that box.


these items can t possibly have any connection but they do, countertops, home maintenance repairs, kitchen design, repurposing upcycling


Original article and pictures take http://www.hometalk.com/10922148/these-items-can-t-possibly-have-any-connection-but-they-do site

DIY: Adding Wrought Iron Spindles


We recently had our oak spindles replaced with wrought iron ones in order to update the look of our railings. That along with a coat of paint on the bottom made a huge difference in the look and updated the whole space.
We have a lot of railing in our house. Our upstairs is open to our family room below so when you look up, you used to see an expanse of oak.
Here is the before shot.


Our contractor actually completed this project, but I watched him do it and thought I'd share the steps with you. If you have the right tools and enjoy a DIY project, you can completely do this one yourself.
Our new spindles were purchased at Lowes and we did a double barrel followed be a twist alternating them. They are the matte black look.
First step is to use a reciprocating saw to saw off the old spindles.
Screws at the bottom of the spindle should be removed.


diy adding wrought iron spindles, diy, stairs, woodworking projects


Using liquid nail attach the shoes to the bottom and then screw them in place. Next place your new spindle in the bottom shoe and screw it in to place. The tops should fit into the existing holes pretty loosely. A second shoe is then liquid nailed and screwed into place.


diy adding wrought iron spindles, diy, stairs, woodworking projects


diy adding wrought iron spindles, diy, stairs, woodworking projects


diy adding wrought iron spindles, diy, stairs, woodworking projects


A coat of white paint on the bottom freshened up the look.
We chose to leave the balusters and top rail oak. We like the contrast of the wood with the white and I have several light oak antique pieces throughout our home that will never see paint, so it works with our eclectic look.
You may choose to paint or stain accordingly for a look that works for you. For all the photos on the final look, please visit the blog.
The biggest consideration when doing this project is to keep building requirements in mind. For more information on these codes and a chart to follow, see the full post on my blog: http://mylifefromhome.com/2015/10/diy-railings-adding-wrought-iron-spindles/


diy adding wrought iron spindles, diy, stairs, woodworking projects


Original article and pictures take http://www.hometalk.com/10920279/diy-adding-wrought-iron-spindles site


How to Install Heated Tile Flooring.... and Also How Not To!

We recently installed heated tile flooring in our master bathroom and I'm so glad we took on that little bit of an extra step and got it done! What a difference it makes now that the temperatures are getting cooler! Of course, not everything went completely smoothly and we definitely learned a few things along the way. Check out the full blog post for all my tips and to see the process step-by-step!


A heated tile floor is such a luxury on cold winter mornings! Natural stone like this slate heats up really nicely.


how to install heated tile flooring and also how not to, flooring, how to, hvac, tile flooring


The hardest part is definitely figuring out how you want to lay all of your wiring down to cover all the spaces that you want heated in your room.


how to install heated tile flooring and also how not to, flooring, how to, hvac, tile flooring


These clever plastic guides hold everything in place and are really easy to use!


how to install heated tile flooring and also how not to, flooring, how to, hvac, tile flooring


Laying large tiles over top of everything can be a bit tricky so these tile leveling clips really help you get a great end result!


how to install heated tile flooring and also how not to, flooring, how to, hvac, tile flooring


Original article and pictures take http://www.hometalk.com/10919968/how-to-install-heated-tile-flooring-and-also-how-not-to site

Refurb an Inexpensive Big Lots Ottoman

I bought this little ottoman last year. Of course it didn't take long for one of my kids to rhim it. I've been trying to think of a way to fix it. And today I thought of a way! So off to Joanne's craft store I went. I knew the ottoman had good cushion, so all I really needed was fabric. And I found the perfect burlap, on sale!


Isn't this burlap absolutely perfect!?


refurb an inexpensive big lots ottoman, painted furniture


I removed the cheap vinyl cover that was tore on the lid.


refurb an inexpensive big lots ottoman, painted furniture


Heated up my glue gun and measured the burlap to fit tucked over the edge of the lid. Once the glue gun was heated, I wrapped the burlap onto the ottoman lid and glued the edges onto the under side. I really didn't pay attention to perfection as I figured no one but me will see that. But if I was doing this for someone else, I definitely would've put more precision in here.


refurb an inexpensive big lots ottoman, painted furniture


Pulling the burlap as taut as possible, I hot glued it into place


refurb an inexpensive big lots ottoman, painted furniture


I did the longer sides first and the ends I folded like a Christmas present, knowing I'd be using furniture tacks to hold the burlap more securely with the glue.


refurb an inexpensive big lots ottoman, painted furniture


Once I glued the burlap on the way I wanted, I then placed the furniture tacks to hold it more securely and to add a bit of charm and texture. The tacks were longer than the wood so the sharp pieces went straight through. I bent them, hammered them down and put a dot of hot glue on them to prevent being poked in the future.


refurb an inexpensive big lots ottoman, painted furniture


And the final product. I love how it turned out. I completed this project in about an hour. The burlap was on sale so that was a plus, I bought 3 years I case I decide to cover the rest of the ottoman at a later time.


refurb an inexpensive big lots ottoman, painted furniture


Original article and pictures take http://www.hometalk.com/10913635/refurb-an-inexpensive-big-lots-ottoman site

Turn a Headboard Into A Menu Chalkboard


I took an old headboard, removed the slats, and created a Menu Board. Perfect for the kitchen or dining area. Bon Appetit!
http://www.slipcoveredgrey.com/2012/02/menu-board.html


turn a headboard into a menu chalkboard, home decor, Before


turn a headboard into a menu chalkboard, home decor, After


Original article and pictures take http://www.hometalk.com/1090914/turn-a-headboard-into-a-menu-chalkboard site


DIY Paint Dipped Artwork

Okay, have you guys seen this paint dipped artwork thing before? Now I know this is a love it or hate it kind of thing, but I was at the Habitat store and I stumbled across these three perfect pieces and the idea wouldn’t leave me alone.


diy paint dipped artwork, crafts, home decor, wall decor


You probably saw them and wondered what in the world I was going to do with them if you follow me Instagram. Don’t worry, as cute as these prints looked in my Instagram photo they aren’t original paintings and they weren’t in the best of condition.


diy paint dipped artwork, crafts, home decor, wall decor


I simply spray painted the frames gold and once they were dry I taped off a 1/3 section of the paintings and sprayed them with three shades of the same color.


diy paint dipped artwork, crafts, home decor, wall decor


I was just shocked I found three pieces that fit my space…winning!!!


diy paint dipped artwork, crafts, home decor, wall decor


diy paint dipped artwork, crafts, home decor, wall decor


I like to think of it as giving new life to these forgotten pieces. And I’m feeling kind of bold right now so I’m giving it a thumbs up!


diy paint dipped artwork, crafts, home decor, wall decor


Original article and pictures take http://www.hometalk.com/10908231/diy-paint-dipped-artwork site