I have very detailed pictures and steps to use this new paint all on my blog. There is also a voting going on and the link for that is provided within my post on my blog as well. If you would like to see the other blogs and what they did with their Rast dressers you can see that in the link provided on my blog as well. Thanks for any votes!
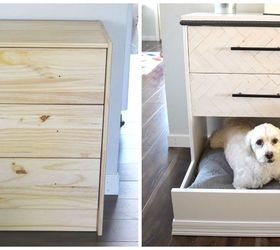
I took out the bottom drawer, removed the front piece of the dresser. Then added wood boards to the bottom. Giving this dresser a much needed boost in height. Teddy is small but not that small.
I took apart the third drawer and put the sides onto the front. Connecting with a bracket. The front of the drawer became the front of the new dog bed.
I also selected a new wood top and some trim to go around the top of the dresser. Giving some much needed details. I cut the trim corners at a 45 degree angle to make the corner be flush and clean looking. I painted the trim a charcoal gray from the new Piittsburgh paint door, trim and furniture brand.
To make the dog bed be cohesive to the dresser, I added floor board trim around the bottom of the dresser and dog bed. Meshing them together.
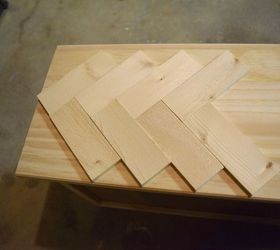
For the drawers, I cut a bunch of small wood pieces about 3 inches long. Put some wood glue on them.
Then placed them on the drawer in a herringbone pattern.
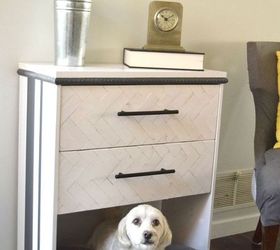
I painted the dresser, drawers and top white. Using the same dark gray I painted some stripes going down the side.
I selected my hardware from Hickory Hardware. Bringing out the darker colors in this with the drawer pulls being dark as well.
It was done! This has not become one cute and comfy home for Teddy!
I liked the pop and contrast of the white and dark gray. Adding the herringbone design gave the front of this a few tiny details.
There is only one problem... I have one dresser turned into a dog bed and two dogs.... Teddy loves it and Finn is envious!
Original article and pictures take http://www.hometalk.com/10852303/ikea-hack-rast-dresser-into-dog-bed site
Комментариев нет:
Отправить комментарий