We built this desk using an old door that's been sitting in the attic, an Ikea desk frame and a sliding keyboard kit. The desk frame is height adjustable, making it great for the long-legged.
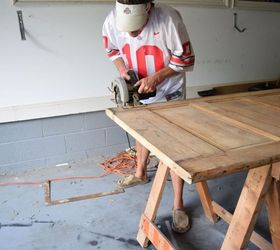
projects decorWe trimmed the original door from 7' down to 5.5'. I stumbled upon an adjustable height desk frame at Ikea, the BEKANT Underframe for table top.
We positioned the underframe on the door. It was that kismet thing again because the frame perfectly fit the raised areas of the door so that we did not need to build up any of the recessed panels. Worse come to worse, we would've attached some wood to the recessed areas to build them up to the non-recessed height so that the frame would attach I wanted a sliding keyboard tray on the underside of my desk. After doing much research, I decided on the Rockler 12 Keyboard Slide. . In searching for reviews on the product, I came across Yellow Brick Home's experience with it, which confirmed my intent to go ahead and get it. You can't beat the price, $34.99; but more than that, it's incredibly sturdy, you can determine how wide you want your tray and you can paint the wood for the tray any color you like.
Figuring out where to attach the sliding keyboard tray was a little wrinkle. In the perfect world it would have recessed farther back, but we were constrained by the frame as to where we could attach it. But truthfully, after working with it for the past month+, I'm perfectly fine with it. This next photo shows us looking at different options in the placement of the keyboard tray. Do figure that out before you attach your frame. We figured if we needed to we could've moved the frame a little off center to accommodate the keyboard tray, but in the end we didn't need to. Once we figured out the placement of the frame and the keyboard tray, it was time to attach the BEKANT frame to the bottom of the door. This frame is very sturdy. You can see how you adjust the height of the table...the bottom half of the legs slide out. Terry's marking where the frame goes in this picture. We actually moved the whole shebang inside the house for the rest of the project as the finished desk would not have fit through the doors otherwise.
 Once it was inside and we had the frame attached, it was time to attach the sliding keyboard tray. I had purchased a piece of pine that was 15" wide so Terry only needed to cut down the length to 27" which is what we decided would be 'optimal' for my keyboard and mouse pad. I spraypainted the whole thing a glossy black. I had initially thought I wanted a real color, but decided to stay neutral-ish and to make the keyboard less prominent.
 You can see in this picture how the brackets for the keyboard needed to be placed taking into consideration the frame.
 I put 1/4" thick glass on it, adjusted the legs and it's so perfect and sturdy.


Original article and pictures take http://www.hometalk.com/10858864/roadside-rescued-and-up-cycled-office-storage site


Комментариев нет:
Отправить комментарий