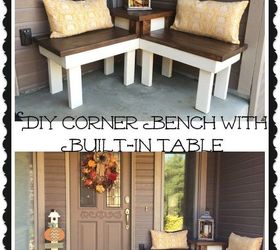
I wanted a firewood rack to match the corner bench I made and to continue with my plan to create an inviting front porch. Here's what I came up with!As part of my front porch makeover, I wanted a firewood rack to store firewood and kindling for the winter. I knew I didn't want the typical firewood rack that has a shelf on the bottom and two sides, I wanted something that looked a little more elegant and that matched the corner bench with a built-in table that I built and posted about here. Here's a pic from that project: So, I decided to make a firewood rack that I could also use to show off seasonal decor or to use as a front porch shoe rack during the non-winter months. Here is what I came up with:
 I still need to tile or stain the concrete, but that will be a future project. We also will eventually replace the front door and add some stone to the walls, but those too are projects for another day. I'm just glad my front porch doesn't look so sad and pathetic anymore! Here's a pic of the before:
 And here's my updated front porch after adding the wreath, the corner bench, the sign post, and my new firewood rack (all designed and built my me!):
 My front porch is now much brighter and a much happier place to be. :-) I no longer cringe when I drive up the driveway to our house!
Here are the plans for the firewood rack and kindling storage:
Materials:
6 - 2x4 @ 8
4 - 1x3 @ 6
2 - 1x6 @ 8
2 1/2 exterior wood screws
Pocket hole jig (I use Kreg K5)
2 1/2 exterior pocket hole screws
Wood glue
Countersink drill bits
Cut List:
4 - 2x4 @ 33 1/2 (frame - legs)
6 - 2x4 @ 28 3/4 (top and bottom supports for front and back frame, and bottom shelf)
8 - 2x4 @ 10 (top and bottom side frame supports)
3 - 2x6 @ 36 (top shelf)
1 - 2x4 @ 36 (top shelf)
1 - 2x4 @ 31 3/4 (bottom shelf)
1 - 2x6 @ 31 3/4 (bottom shelf)
6 - 1x3 @ 28 3/4 (Back slats)
2 - 1x6 @ 28 3/4 (middle shelf)
6 - 1x3 @ 7 58 (side vertical design boards)
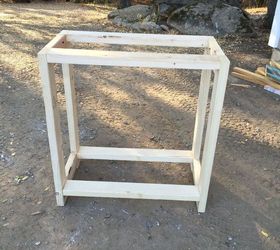
First, cut the 2x4 boards to build the frame. Once the boards are cut, drill two 1 1/2 pocket holes into each end of one side of the 28 3/4 24 boards and into each end of one side of the 2x4 10" boards. Next, use wood glue and 2 1/2" exterior pocket hole screws to assemble the frame :
 Once all the 10" 2x4 boards are attached on each side, cut six 1x3 boards at 7 5/8" each. Drill two 3/4" pocket holes into each end of one side of each of the six boards. Using wood glue and 1 1/4" pocket hole screws, attach three 1x3 boards on each side, between the middle two 10" 2x4 boards. Leave a 5/8" gap between each board.
 Next cut the boards to build the back of the firewood rack. Cut six 1x3 boards to 28 3/4". Use wood glue and 2 1/2" exterior wood screws to attach the boards to the back legs (I predrilled through the sides of the legs with a countersink drill bit, and then attached the boards through the legs. I used a 2x2 board as a spacer to evenly space out each 1x3 board:
 Next, build the middle shelf. Cut two 1x6 boards to 28 3/4" each. Then, in one of the boards, drill three 3/4" pocket holes into the long side of one side of one board. Drill two 3/4" pocket holes into each of the short sides on one side of both boards (see picture below). Next, use 1 1/4" pocket holes to attach the two boards together. Use 1 1/4" pocket hole screws and wood glue to attach the middle shelf to the 2nd most upper 10" 2x4 board. The bottom of the shelf is 19 3/4" from the ground.
I then filled all pocket holes and screw holes with wood filler and once dry, I sanded the portion of the firewood rack that was complete and then painted it white with Rustoleum Heirloom White in satin finish. While that was drying, I built the top and bottom shelves (which will be stained a walnut color).
I then cut the boards for the top shelf of the firewood rack.
I drilled three 1 1/2" pocket holes into one of the long sides on one side of each of the three 2x6 boards. I then used wood glue and 2 1/2" pocket hole screws to attached the boards to create the top shelf.
Then, I cut the boards for the bottom shelf. At this point I sanded the assembled top shelf and each of the boards for the bottom shelf. I then stained them all a Dark Walnut using Varathane stain. Once the white paint on the frame had dried, and the stain on the shelf boards had dried, I attached the top shelf to the top of the firewood rack. I used wood glue and countersunk 2 1/2" exterior wood screws to attach the top shelf (attached through the top of the top shelf boards down into the frame boards). The top shelf should overhang the front and back of the frame by 1 1/4" on each side, and should overhang the right and left sides of the frame by 2 1/8" on each side.
I then attached the bottom shelf boards, again using wood glue and countersunk 2 1/2" wood screws. For the front and back 2x4 boards, I attached those from the top. For the middle 2x4 and 2x6 bottom shelf boards, I had to flip the rack upside down, and then use a long countersink drill bit that would drill deep enough to allow a 2 1/2" exterior wood screw to screw into the bottom shelf board.
I filled in all pocket holes and screw holes on the top and bottom shelves with wood filler, and once dry, I sanded the spots and then touched up the stain. Here is a pic prior to applying Spar Urethane: I added three coats of Varathane Exterior Spar Urethane in satin finish. Once dry, I moved to its new location on my front porch. Since I wanted my firewood rack to store kindling as well as firewood, I purchased two of these wood crates at Walmart for $11.50 each (eventually I plan on staining or painting these, but again, another project for another day! :-) ). I'm going to fill both of these with kindling and they will be stored on the middle shelf of my rack.
 And here are some more pics of my firewood rack:
 For more pictures and full instructions for building this firewood rack, please visit my website at the link below.
Original article and pictures take http://www.hometalk.com/10789036/diy-firewood-and-kindling-storage site


Комментариев нет:
Отправить комментарий